Table of contents
Keywords: Sizing, Bias Point, gm/ID, Current Mirrors, Cascode, CS, CD, CG, Differential Pair, OTA
Circuits
Most of the circuit design on integrated circuits uses MOSFET transistors. This document provides a short refresh of the most common circuits and their properties.
But first, how should transistors be used, and sized.
Transistor size and bias point
In Figure 1 and Figure 2 we can see two transistors. One with short gate length (approximately 1F2 = 1.2 x minimum gate length) and one with longer gate length (approximately 5F0 = 5.0 x minimum gate length). The width of both transistors is sufficient to have 2 contacts on the drain/source (2C).
These transistors come from a standard transistor library I’ve made, and that can be found at JNW_ATR_SKY130A.
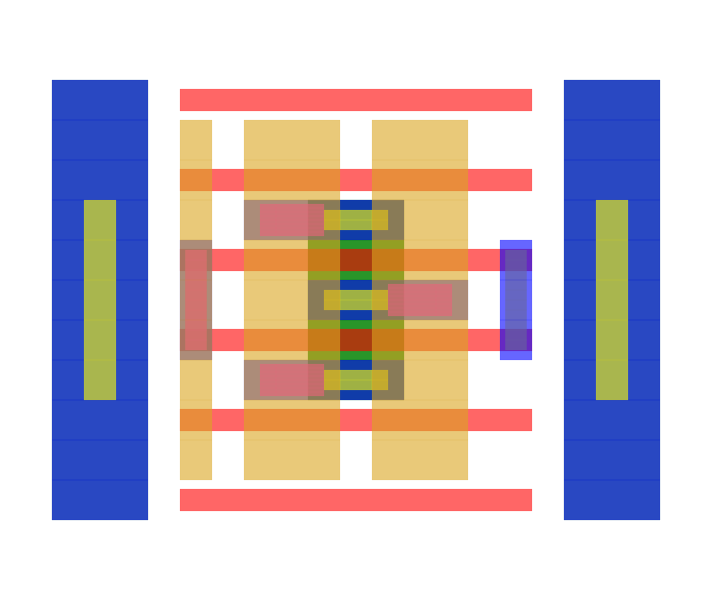
Figure 1: JNWATR_PCH_2C1F2 transistor
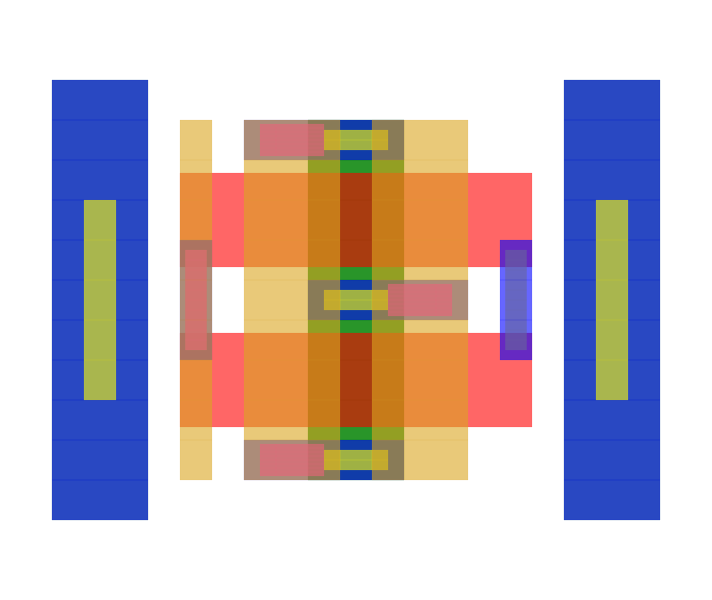 Figure 2: JNWATR_PCH_2C5F0 transistor
In all our circuits we will need to pick the right size, but how should we do it?
By now you should know that MOSFETs have different regions of operation. Related to the $V_{GS}$ we talk about weak inversion, moderate inversion and strong inversion. These names correspond directly to the density of charge carriers in the thin inversion layer underneath the oxide in the channel. See MOSFETs lecture for details.
In Figure 3 we can see how the log of the current changes behavior at low $V_{GS}$ versus at high $V_{GS}$. As such, when we pick the transistor size we should be conscious of which region we operate the transistor in. The regions (weak, moderate, strong) have different behaviours.
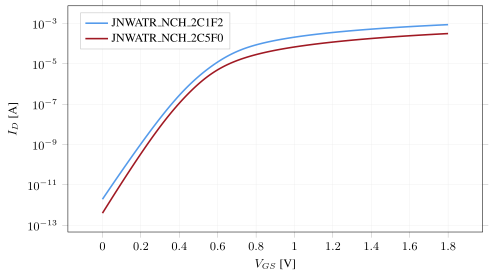
Figure 3: Log of drain current versus gate/source voltage
One of the behavior differences is the “bang-for-the-buck”. For a circuit we may target a specific number for the transconductance ($g_m$). In Figure 4 we can see how the $g_m/I_D$ changes as we sweep the $V_{GS}$
In weak inversion, we have a large bang for the buck
\[g_m/I_D \approx 1/n/V_T \approx 1/1.5/26\text{ mV} \approx 25\]While in strong inversion
\[\frac{g_m}{I_D} = \frac{2}{V_{eff}}\]where the effective overdrive is
\[V_{eff} = V_{GS} - V_{TH}\]In moderate inversion, the $g_m/I_D$ is somewhere between the two.
Assume we need a transconductance of 1 mS. If we have a $g_m/I_D = 10$, then we’d need at least 100 $\mu$A in the transistor. If we had a $g_m/I_D = 15$, then we’d only need 66 $\mu$A in the transistor.
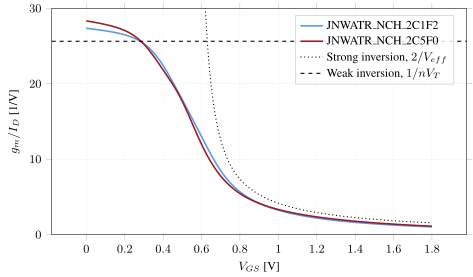
Figure 4: gm/Id (Y-axis) versus Gate voltage (X-axis)
When the $g_m/I_D$ choice is made, then there are some things that have already been determined. One is the necessary drain/source voltage for the transistor to operate in “saturation” or “linear” region.
For most circuits we want the transistor to operate in “saturation” region, as such, we must provide a certain drain source voltage.
In Figure 5 you can see how the $V_{dsat}$ of the transistor changes as the $g_m/I_D$ changes.
Notice that the two transistors have different $V_{dsat}$. The shorter transistor needs less voltage across drain/source to operate in saturation.
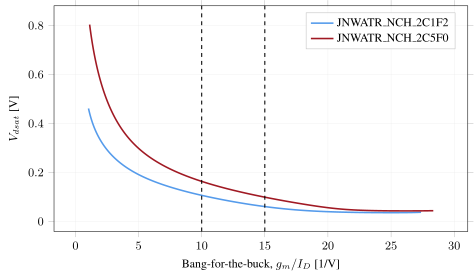
Figure 5: Vdsat versus gm/Id
The choice of $g_m/I_D$ also determine what the gate source voltage is. It’s actually rare we control the gate voltage directly to set the bias point of the transistor. It’s more common to bias transistors with a current, and let the $V_{GS}$ be whatever the $V_{GS}$ needs to be.
In Figure 6 we can see that at $g_m/I_D$ of 15 we have a lower $V_{GS}$ than $g_m/I_D$ of 10.
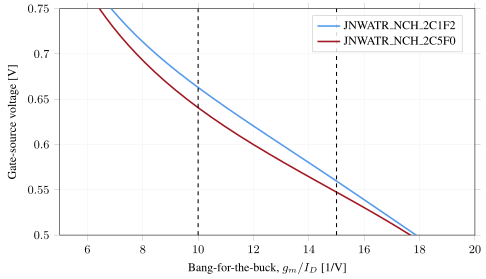
Figure 6: Vg versus gm/Id
The choice between the two transistors come down to “What intrinsic gain do I need in my transistor?”.
For current mirrors we really don’t want the output current to change with $V_{DS}$ so we want a small conductance ($g_{ds}$), or a large intrinsic gain ($g_m/g_{ds}$).
In Figure 7 we can see how the intrinsic gain of the two transistors is different. For the 1F2 we can also see there is some funky behavior above gm/id of 20, I don’t know why, but I suspect something funky in the model (non-physical).
For a larger intrinsic gain we should pick a longer transistor.
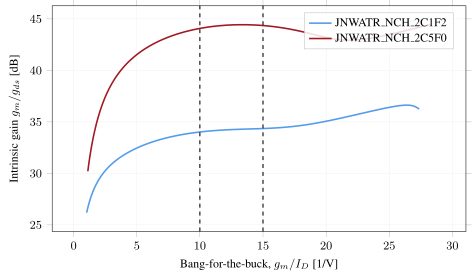
Figure 7: gm/gds versus gm/Id
Transistor sizing strategy
Option 1: Full freedom
If you really want to dig deep, and get your transistor size exactly correct, then method that makes most sense to me, is to use the inversion-coefficient method, described in
This is similar to a gm/Id strategy, but we’re rather looking directly at the inversion level
The inversion coefficient tells us how strongly inverted the MOSFET channel (inversion layer) is. A number below 0.1 is weak inversion, between 0.1 and 10 is moderate inversion. A number above 10 is strong inversion.
There are also some blog posts worth looking at Inversion Coefficient Based Circuit Design and My Circuit Design Methodology.
Option 2: Constrained
“Full transistor size freedom” “is similar to giving a loaded gun to a kid and say “don’t shoot yourself”. It’s a bad idea!
If you’re inexperienced with transistor sizing I would highly recommend to pick a few transistors, and compute the parameters ($V_{GS}$, $V_{dsat}$, …) for the transistor, and then use a limited set.
That’s exactly what I’ve done i
I would encourage you to only use transistors from that library in your design. I always do that when I do design, in any technology.
My circuit does not work, why????????????????
The reason is usually that the transistors are not operating in the correct region. So either the $V_{GS}$ is causing problems or the $V_{DS}$ is not high enough.
In Figure 8 we can see how the $V_{GS}$ of transistors change with corner. It’s usually highest for slow-slow and low temperature, and the lowest for fast-fast and high temperature. But even that statement is obviously not always correct. For a gm/Id of 6 we can see that it’s the low temperature that has the lowest $V_{GS}$.
If we observe the equation for the current in strong inversion
\[I_D = \frac{1}{2} \mu_n C_{ox} \frac{W}{L}\left( V_{GS} - V_{TH}\right)^2\]we can see that the current decreases if the $V_{TH}$ increases, and we can see that current increases if the mobility ($\mu_n$) increases. The threshold voltage increases at low temperature. The mobility increases at low temperature. At a gm/Id of a bit more than 8 we can see that from Figure 8 the two effects cancel each other. While for lower gm/Id the mobility becomes dominant, and lowers the $V_{GS}$.
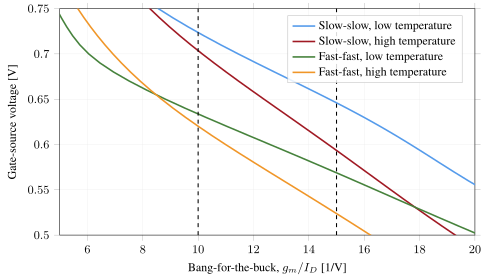
Figure 8: Gate-source voltage as a function of corner
The drain-source voltage does not change that much with corner, but it does change. The deeper into strong inversion we go, the larger the change.
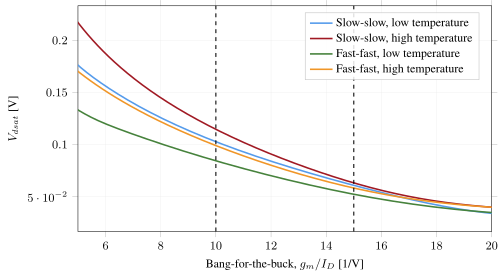
Figure 9: Drain Saturation Voltage as a function of corner
As such, for any transistor design, it’s necessary to see exactly what voltages and currents flow in your transistors.
Most tools can show the operating point in the schematic, which makes it easier to figure out what the voltages and currents are. In Figure 10 we can see an example from TB_JNW_TEMP_OP
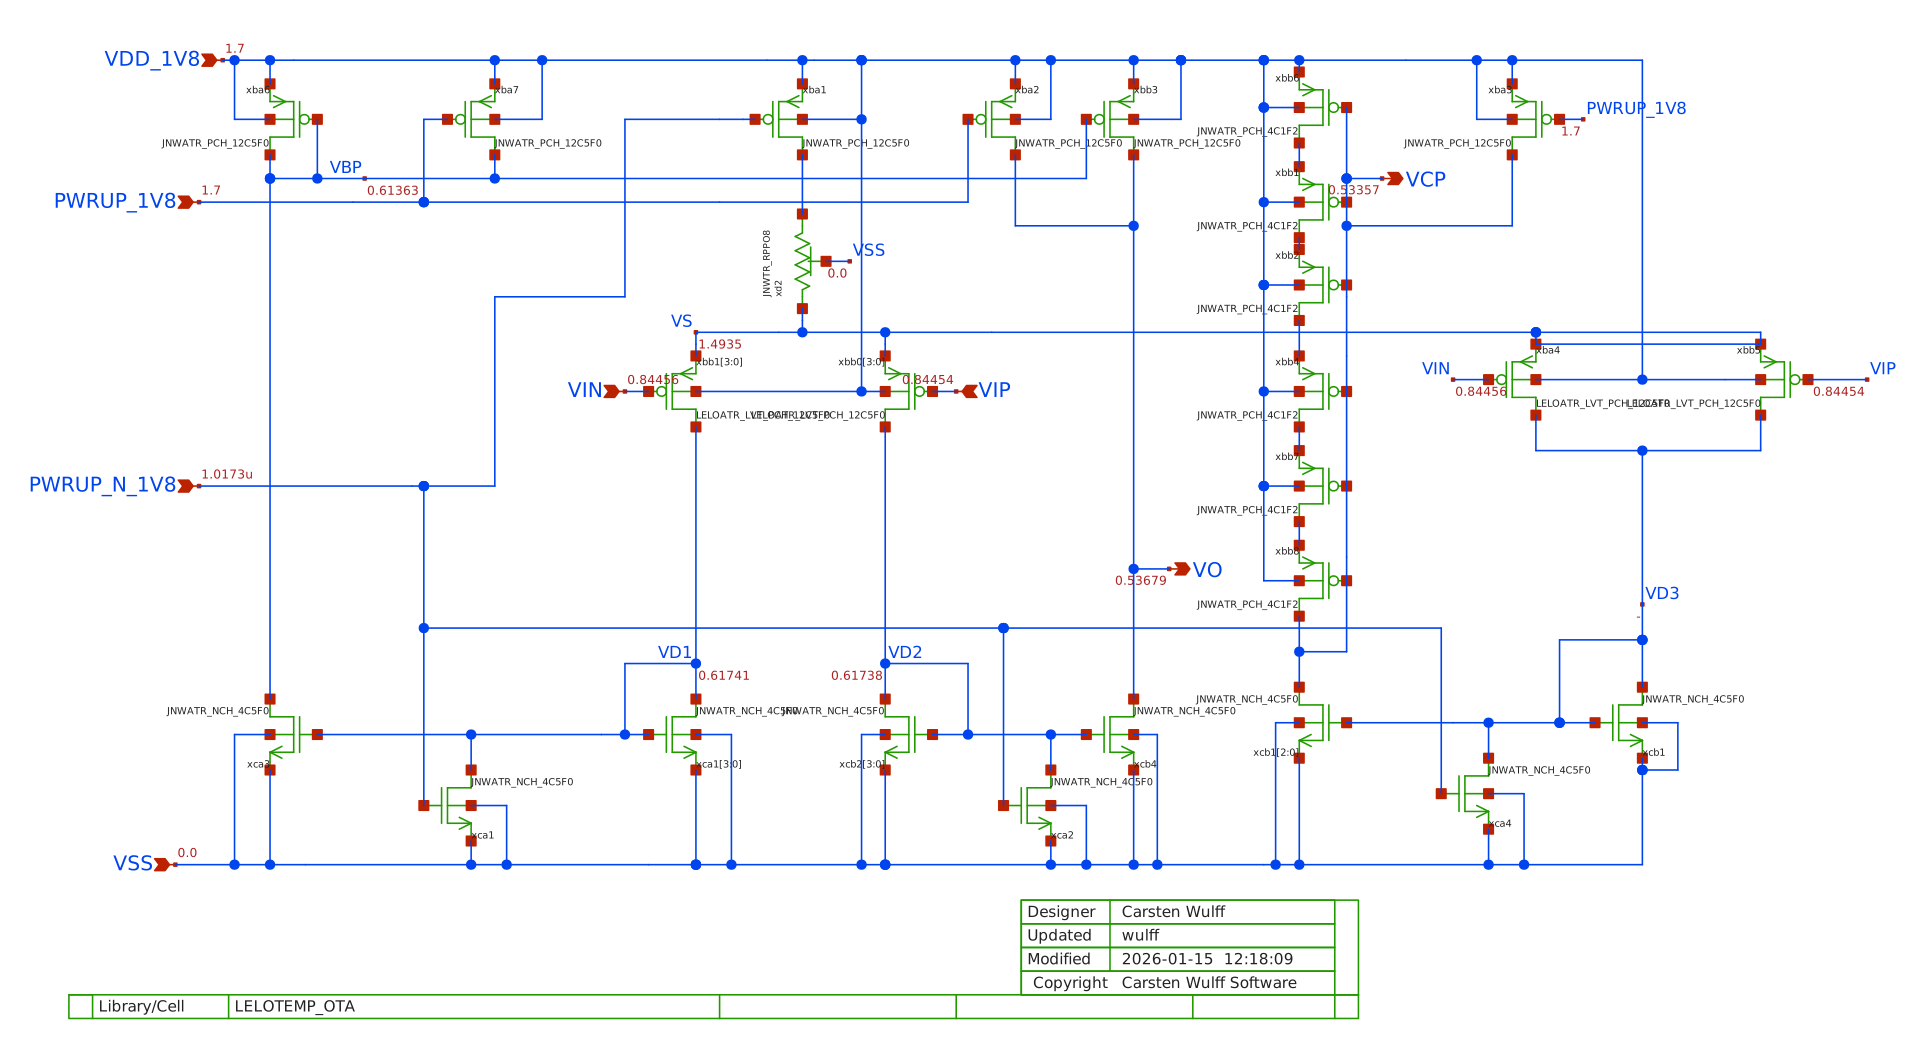
Figure 10: Example of operating point annotation
Current Mirrors
MOSFETs need a current for the transistor to be biased in the correct operating region. The current must come from somewhere, we’ll look at bias generators later. Usually there is a central bias circuit that provides a single, good, reference current.
On an IC, however, there will be many circuits, and they all need a bias current (usually). As such, we need a circuit to copy a current.
In the figure below you can see a selection of current mirrors. They all do the same thing. Try to ensure that $i_i$ and $i_o$ are the same current.
Which one we choose is usually determined by what we mean by $i_i = i_o$. Do we mean “within $\pm$ 10 %”, or “within $\pm$ 2 %”.

Figure 11: Example of current mirrors
Normal current mirror
The normal current mirror consists of a diode connected transistor ($M_1$) and a common source transistor $M_2$.
If we assume infinite output resistance of the MOSFETs, then the drain voltage does not affect the current.
If the two transistors are the same size, threshold voltage, mobility, etc, and they have the same gate-source voltage, then the current in them must be the same.
A current pushed into $M_1$ will cause the $V_{GS1}$ to rise, and at some point, find a stable point where the current pushed in is equal to the current in $M_1$
$M_2$ will see the same $V_{GS1} = V_{GS2}$ so the current will be the same, provided the voltage at $i_o$ is sufficient to pinch-off the channel of $M_2$, or the $V_{DS2} \approx 3 kT/q$ if the transistor is in weak-inversion.
The output resistance of a normal current mirror is simply the $r_{ds}$ of the output transistor.

Figure 12: Normal current mirror
Source degenerated current mirror
In most modern technologies, and if we care about the output current accuracy, then a normal current mirror cannot give us a sufficient independence of the drain/source voltage.
When we use more advanced current mirrors, it’s almost always to increase the output resistance, and make the current mirror more like a current source.
In Figure 13 we can see a current mirror with resistors on source.

Figure 13: Source degenerated current mirror
Observe the small signal model in Figure 14. If we now apply a test current $i_x$ we can compute what the output resistance is ($r_{out} = v_{x}/i_x$)
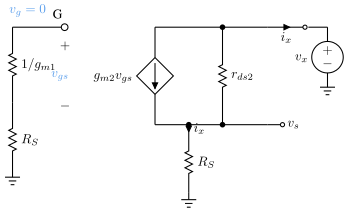
Figure 14: Source degenerated current mirror small signal model
\(v_{gs} = -v_{s}\), \(v_{s} = i_x R_s\), \(r_{out} = \frac{v_x}{i_x}\)
\[i_x = g_{m2} v_{gs} + \frac{v_x - v_s}{r_{ds2}}\] \[i_x = -i_x g_{m2} R_s + \frac{v_x - i_x R_s}{r_{ds2}}\] \[v_x = i_x\left[ r_{ds2} + R_s(g_{m2} r_{ds2} + 1)\right]\]Rearranging
\[r_{out} = r_{ds2}[1 + R_s(g_{m2} + g_{ds2})] \approx r_{ds2} [1 + g_{m2}R_s]\]Cascoded current mirror
To further increase the output resistance, we can move to a cascoded current mirror as shown in Figure 15.
Now we need a separate voltage to bias the cascode to ensure that the source node of $M_3$ keeps the drain node of $M_1$ above $V_{DSAT}$.
If we bias the cascode correctly, then even if the voltage at $i_o$ changes, then the source of $M_4$ does not really change, and the current in $M_2$ stays the same.

Figure 15: Cascoded current mirror
From source degeneration (ignoring bulk effect)
\[r_{out} = r_{ds4}[1 + R_s(g_{m4} + g_{ds4})]\] \[R_S = r_{ds2}\] \[r_{out} = r_{ds4}[1 + r_{ds2}(g_{m4} + g_{ds4})]\] \[r_{out} \approx r_{ds2}(r_{ds4}g_{m4})\]Active cascodes
If we need even higher output resistance, then we can add a operational transconductance amplifier (OTA) to the gate of the cascode to further increase the $g_m$ of the cascode.
In OTAs it’s common to increase the open loop gain by increasing the output resistance. The output stage of an OTA is usually current mirrors, as a result, one can end up with active cascodes in the OTA that is used in the active cascode of the current mirror. All horribly complicated, but sometimes necessary.
Watch the polarity, because it is easy to draw this circuit as an oscillator. The node being regulated is the drain of the mirror device, and it must go to the amplifier’s inverting input, with $V_B$ on the non-inverting one. Then a rise on that node drives the cascode gate down, the cascode conducts less, and the node comes back down. Swap the two inputs and every part of that sentence reverses: the node rises, the gate rises, the cascode pulls harder, and the node rises further. Same devices, same $A$, and the loop runs to a rail instead of regulating.
\[r_{out} \approx r_{ds2}(A r_{ds4} g_{m4})\]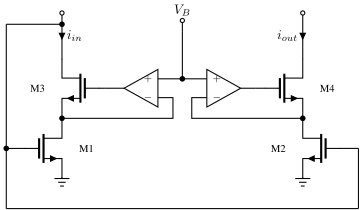
Figure 16: Active cascode current mirror
Amplifiers
There are usually three amplifiers that we consider when we talk about single transistors. Common Source, Common Gate and Source Follower.
For two transistors there are a few more possibilities. I’d highly recommend Fifty Nifty Variations of Two-Transistor Circuits: A tribute to the versatility of MOSFETs 3
Source follower
The source follower can be seen in Figure 17. The input signal is at the gate, and the output at the source. The transistor and its bias current source form a level shifter: the output follows the input, one $V_{GS}$ lower. The properties we care about are
Input resistance \(\approx \infty\)
Gain \(A = \frac{v_o}{v_i}\)
Output resistance \(r_{out}\)
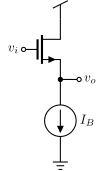
Figure 17: Source follower
Small signal gain
To find the gain, replace the transistor with its small signal model, as shown in Figure 18. The drain is at the supply, and the supply does not move for small signals, so the drain rail is at AC ground. The source rail is the output. Between the two hang the transconductance, the bulk transconductance, and $r_{ds}$.
Sum the currents into the output node, and set the output current to zero
- nothing is loading us:
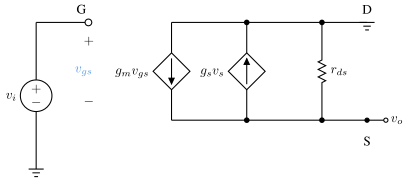
Figure 18: Source follower small signal model
\[i_o = v_o (g_{ds} + g_{s}) - g_{m} v_i + v_o g_m\] \[i_o = 0\] \[g_m v_i = v_o ( g_m + g_s + g_{ds} )\] \[A = \frac{v_o}{v_i} = \frac{g_m}{g_m + g_{ds} + g_s}\]Gain is less than 1
The transconductance appears both on top and in the bottom of the fraction, so the gain approaches, but never reaches, one. The bulk transconductance $g_s$ is the main thief: with bulk tied to ground the gain of an NMOS follower is typically 0.8 to 0.9.
Output resistance
The same equation gives the output resistance. Zero the input, push a current into the output, and see what voltage builds up:
\[i_o = v_o (g_{ds} + g_{s}) - g_{m} v_i + v_o g_m\] \[v_i = 0\] \[i_o = v_o (g_{ds} + g_{s} + g_m)\] \[r_{out} = \frac{v_o}{i_o} = \frac{1}{g_m + g_{ds} + g_{s}}\] \[r_{out} \approx \frac{1}{g_m}\]A $1/g_m$ output resistance is the point of the whole circuit: it is the cheapest low impedance money can buy in CMOS. Whatever fragile, high impedance node you have, a follower turns it into a node that can drive real capacitance.
Why use a source follower?
A concrete example makes the point. In an image sensor pixel a photodiode collects charge on a tiny sense node - say 1 fF. Assume the light gives us 100 electrons.
Look at which way round the diode sits, because it is the opposite of what the symbol suggests. RST charges the sense node to 3.0 V, so the cathode has to be the node and the junction is reverse biased. Turn the diode around and it is forward biased at 3 V, clamping the node near 0.6 V, and there is no pixel left. The photocurrent therefore runs against the triangle, down and out of the sense node, and that is where the minus sign in $\Delta V$ comes from: light does not charge the node, it discharges it.
What the diode symbol is standing in for is an n region in a p well, depleted from end to end, and the electrons the light frees collect in it. TX is the transfer gate. Because the n region is fully depleted there is no potential minimum left to strand carriers in, so opening TX moves the whole electron packet across in one go and leaves nothing behind for the next frame - which is the reason a modern pixel is built this way rather than reading the diode’s own node directly. The 1 fF the packet lands on is the floating diffusion, and $\Delta V$ is measured there, not at the diode.
In Figure 19 the sense node drives the gate of a source follower. The gate draws no charge, so all 100 electrons stay on the 1 fF, and the signal is a healthy 16 mV, which the follower copies onto the 1 pF bus below.
Assume 100 electrons
\[\Delta V = Q/C = -1.6 \times 10^{-19} \times 100 / (1\times 10^{-15}) = - 16\text{ mV}\]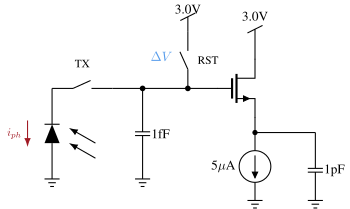
Figure 19: Sense node buffered by a source follower
\[\Delta V = Q/C = -1.6 \times 10^{-19} \times 100 / (1\times 10^{-12}) = - 16\text{ uV}\]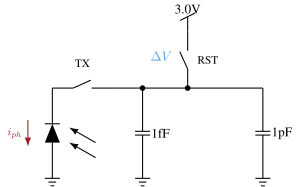
Figure 20: The same sense node connected straight to the bus
In Figure 20 the follower is gone and the sense node must charge the 1 pF bus directly. The same 100 electrons now land on a thousand times the capacitance, and the signal shrinks to 16 uV - buried in the noise. The follower does not amplify anything, and still it makes the difference between a signal and no signal.
Another example of a source follower can be found in A 92.5mW 205MS/s 10b Pipeline IF ADC Implemented in 1.2V/3.3V 0.13um CMOS 4
Common gate
In the common gate stage, Figure 21, the roles rotate: the gate is held at a bias voltage, the signal goes in at the source, and the output is taken at the drain. Nothing amplifies the voltage between input and gate except the transistor’s own $V_{GS}$ - the input current simply reappears at the drain. That makes the common gate a current buffer: a low resistance input, a high resistance output, and a current gain of one.
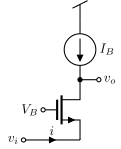
Figure 21: Common gate stage
Start with the input resistance, using the small signal model in Figure
- The gate is grounded, so wiggling the source by $v_x$ makes $v_{gs} = -v_x$: the transconductance pulls current out of the test source, and the input looks like a resistance of roughly $1/g_m$.
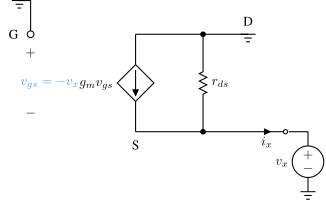
Figure 22: Common gate input resistance
Input resistance
\[i = g_m v + g_{ds} v\] \[r_{in} = \frac{1}{g_m + g_{ds}} \approx \frac{1}{g_m}\]However, we’ve ignored load resistance.
\[r_{in} \approx \frac{1}{g_m}\left(1 + \frac{R_L}{r_{ds}}\right)\]The last line is worth a pause: the friendly $1/g_m$ input resistance only holds if the drain sees a low load resistance. Load the drain with a current source, and the input resistance grows by the ratio $R_L/r_{ds}$
- the cascode chapter of every textbook in one line.
Output resistance
For the output resistance, ground the source: then $v_{gs} = 0$, the transconductance is dead, and the test source at the drain sees only $r_{ds}$, as drawn in Figure 23.
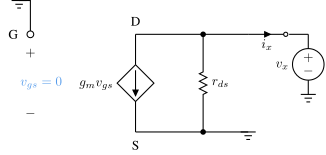
Figure 23: Common gate output resistance
\[r_{out} = r_{ds}\]Small signal gain
For the voltage gain, drive the source and leave the drain open, Figure
- The same $g_m$ that made the input resistance low now pushes its current into $r_{ds}$:
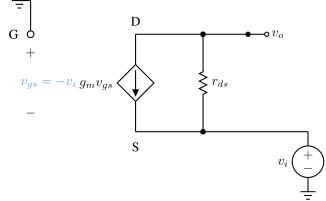
Figure 24: Common gate small signal gain
The gain is the intrinsic gain plus one, and it is not inverting: the common gate has the same gain magnitude as the common source, it just refuses to flip the sign.
The full expression, with nothing ignored, is uglier:
We’ve ignored bulk effect (\(g_s\)), source resistance (\(R_S\)) and load resistance (\(R_L\))
\[A = \frac{(g_{m} + g_s + g_{ds})(R_L \parallel r_{ds})}{1 + R_S\left(\frac{g_m + g_s + g_{ds}}{1 + R_L/r_{ds}}\right)}\]If \(R_L >> r_{ds}\), \(R_S = 0\) and \(g_s = 0\)
\[A = \frac{(g_{m} + g_{ds})r_{ds}}{1} = 1+ g_m r_{ds}\]Check the simplification against the special case above, and note what the full expression adds: the source resistance $R_S$ divides the gain down, and the bulk transconductance helps for once - in a common gate the bulk effect adds to $g_m$ instead of stealing from it.
Common source
The common source stage, Figure 25, is the amplifier: input at the gate, source grounded, output at the drain. It is also a circuit we have already met - the output half of every current mirror is a common source transistor - so the input and output resistances come for free:
\[r_{in} \approx \infty\]\(r_{out} = r_{ds}\), it’s same circuit as the output of a current mirror
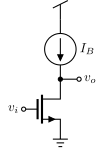
Figure 25: Common source stage
Small signal gain
The small signal model, Figure 26, has only two elements, and the sum of their currents at the output node gives the gain in three lines:
\[i_{o} = g_m v_i + \frac{v_o}{r_{ds}}\] \[i_o = 0\] \[-g_m v_i = \frac{v_o}{r_{ds}}\] \[\frac{v_o}{v_i} = - g_m r_{ds}\]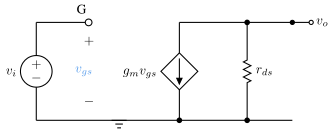
Figure 26: Common source small signal model
The gain is minus the intrinsic gain of the transistor - the most gain a single device can give, which is why the common source is the default gain stage in every amplifier.
Why common source?
The signal from an antenna is microvolts, Figure 27. Before anything can demodulate, filter or digitize it, it must be made bigger - and the only thing that makes voltages bigger is gain. The matching network hands the microvolt signal through an AC coupling capacitor to the gate, a high value resistor from a current mirror sets the bias point without loading the signal, and the common source transistor multiplies the voltage by $-g_m R$. First gain, then everything else.
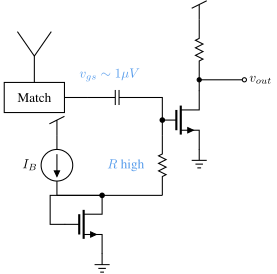
Figure 27: A low noise amplifier is a common source stage
Differential pair
Single-ended amplifiers share a weakness: they cannot tell the signal from the ground bounce. The differential pair, Figure 28, fixes that by amplifying only the difference between two inputs. Two matched transistors share one tail current: with equal inputs the current splits evenly and nothing happens at the outputs. Apply a difference, and current steers from one branch to the other - the tail current is a see-saw, and the differential input tilts it.
Per side, the numbers are the common source numbers:
Input resistance \(r_{in} \approx \infty\)
Gain \(A = g_m r_{ds}\)
Output resistance \(r_{out} = r_{ds}\)
Best analyzed with T model of transistor (see CJM page 31)
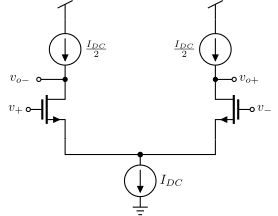
Figure 28: Differential pair
Diff pairs are cool
Two properties make the pair the default input of every OTA. First, whatever is common to both inputs - supply bounce, substrate noise, bias drift - is rejected, because it does not tilt the see-saw. Second, sign is free:
Can choose between
\[v_o = g_m r_{ds} v_i\]and
\[v_o = -g_m r_{ds} v_i\]by flipping input (or output) connections
Summary
The single transistor gives us three views of the same device:
| Stage | \(r_{in}\) | \(r_{out}\) | Gain |
|---|---|---|---|
| Common source | \(\infty\) | \(r_{ds}\) | \(-g_m r_{ds}\) |
| Common gate | \(1/g_m\) | \(r_{ds}\) | \(1 + g_m r_{ds}\) |
| Source follower | \(\infty\) | \(1/g_m\) | \(\approx 1\) |
Common source when you need gain, common gate when you need to move a current without disturbing it, source follower when you need to drive something. Current mirrors bias them all, and the differential pair wraps two common source stages around one tail current so only the difference matters.
Put a differential pair on top of a current mirror and you have built the five transistor OTA - which is where the OTA chapter picks up.
Would you like to know more?
Where the gm/ID way of thinking comes from, in the authors’ own words 1, and the modelling that backs it [@enz17a]
Settling and slewing in feedback amplifiers, which is where this chapter’s transient budget comes from 4
The same ground covered by a different voice, with open tools throughout 3
-
C. Enz and F. Chicco and A. Pezzotta, Nanoscale MOSFET Modeling: Part 1: The Simplified EKV Model for the Design of Low-Power Analog Circuits 2017 https://doi.org/10.1109/MSSC.2017.2712318 ↩ ↩2
-
C. Enz and F. Chicco and A. Pezzotta, Nanoscale MOSFET Modeling: Part 2: Using the Inversion Coefficient as the Primary Design Parameter 2017 https://doi.org/10.1109/MSSC.2017.2745838 ↩
-
H. Pretl and M. Eberlein, Fifty Nifty Variations of Two-Transistor Circuits: A tribute to the versatility of MOSFETs 2021 https://doi.org/10.1109/MSSC.2021.3088968 ↩ ↩2
-
B. Hernes and J. Bjornsen and T. N. Andersen and A. Vinje and H. Korsvoll and F. Telsto and A. Briskemyr and C. Holdo and O. Moldsvor, A 92.5mW 205MS/s 10b Pipeline IF ADC Implemented in 1.2V/3.3V 0.13$\mu$m CMOS 2007 https://doi.org/10.1109/ISSCC.2007.373494 ↩ ↩2